Kit options and additions - Novice Building An Eastport Pram In Australia
Main menu:
Kit options and additions
The kit was supplied by Denman Marine Tasmania ( denmanmarine.com.au )
I think the supplied versions are likely to be stronger and maybe easier to use than the US version, however I was worried about the reduction in separation distance on the transom.
With the rudder retention tang at the top (to save reaching down to the bottom one), the upper pintel has to be a fair way down. As the pintels are closer and I am using the motor pad, the pin alignment did not look great so I added a ply pad for the lower pintel to better line it up with the one on the motor pad. Not too big a problem. Whether or not my 2HP Honda will mount over the pintels is something I will worry about later. It would probably clear gudgeons more easily?
With the rudder retention tang at the top (to save reaching down to the bottom one), the upper pintel has to be a fair way down. As the pintels are closer and I am using the motor pad, the pin alignment did not look great so I added a ply pad for the lower pintel to better line it up with the one on the motor pad. Not too big a problem. Whether or not my 2HP Honda will mount over the pintels is something I will worry about later. It would probably clear gudgeons more easily?
Kit options purchased.
- Eastport Pram (non-nesting type)
- Sailing option (white sail)
- Gunnel Guard (tough bumper strip, continuous, front and sides)
- Marquetry - Sea Turtle
- Ready made straight oars (traditional style)
- Brass rub strips (2)
Kit modifications to suit my situation:-
- I put in a decent sized aft drain with screw-in plug so that I can easily drain the EP on davits. Also required for drainage of any rainwater getting through the (planned) cover, or sea water if underway and uncovered. This involved running a 40mm poly pipe, with lower part removed, through the aft compartment at an angle and glassing it in. It is offset to RHS of the floor, to keep away from the outboard motor, and the actual floor runs right up to the plug so it can drain completely. I used a Tenob large plug and base (35mm) which requires a 40mm cut out. http://www.tenob.co.nz/
- Two strong four bolt pad eyes on upper inside transom for davit tackle. Dome nuts on the external bolt ends.
- Single Wichard 45mm folding eye on inside bow, just above the forward seat for the davit tackle. The lower two holes are used as backing plate for the external bow mounted U- bolt used for towing or anchoring. My wife thought a regular pad eye would dig into your back if rowing in the forward position so it had to fold.
- Inspection ports (100mm, white) in both compartments. To check condition, to store small effects, to access transom pintel bolts. During building, I accessed via the ports to add inside compartment epoxy fillets adjacent to mast step and motor pad for additional strength.
- Added a lower pintel pad in plywood to keep rudder pins aligned.
- Added fillets to planks underside. The initial bonding mix was probably a bit thin for the ambient temperature of 27° C and some of it slowly dribbled out the ends leaving the fill a bit shallow in places. This should also toughen up the undersides and reduce the sanding required. These fillets were all 'alcohol wet thumb smoothed' as per Denman's additional building tips.
- Sailing rig: the main sheet is on 3:1 dinghy blocks (jam cleat optional) for 6mm line and the lower block is on traveller line, strung between the two aft davit eyes. The outhaul line is adjustable via a jam cleat on the boom.
- Trunk plug retention when sailing: toggle pin through a hole in the plug with strong line attached to the front of the centerboard (trunk) case
- Mast retainer: Knotted rope through hole in front seat to a jam cleat on the mast.
- I added a brass rub strip to the skeg. It runs the full length and up the rear of the skeg as launching off a beach often results in some backwards motion.
Trailer kit:-
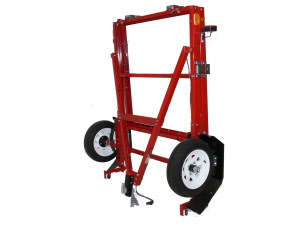
A Carlex "Easy Trailer" 4 foot by 8 foot table top folding light weight trailer, model 850TAB with jockey wheel and spare tyre options. http://www.carlex.com.au/contents/en-us/d3.html
I have some other uses for the trailer. It conveniently folds up and stands vertically when not in use.
The trailer appears to be made for the US market and is very likely available in different markets.
